 DashFox
Hotspots are a demand signal; Peak Pay is an incentive with conditions. DoorDash says Hotspots don't guarantee orders. Peak Pay depends on eligibility, location, acceptance timing and earning mode. [1] [2]
DashFox's pay map answers a different question: it summarizes recorded offer rates by area. It isn't DoorDash's live order queue or a promise of future earnings. Check all the signals alongside the time and miles it would take to reach an area.
First, read what the flame actually means
Dynamic Hotspot
DoorDash describes a currently busy restaurant or area, with a red region and a “Busy hotspot zone” label. [1] That describes demand, not the pay or distance of the offer you'll receive.
Historical Hotspot
The flame appears without the red region and says “Previously busy Hotspot zone.” DoorDash says it is based on recent data about areas usually busy at that time. [1] Historical isn't the same as busy right now.
DoorDash says Hotspots refresh every 10 minutes. You don't have to be inside a red region to receive an order, and no Hotspots showing doesn't mean your app is broken or that offers are impossible. [1]

A map update is not an instruction to drive. Before following a new flame, compare the travel time, miles, parking and pickup access with staying somewhere suitable nearby. Don't count an order you haven't received as the reward for moving.
Then read the bonus: unit, place and time
DoorDash's Peak Pay guide says it is available to select Dashers at select times; check the Promos tab for your own eligible incentives. In Earn per Offer, it adds to eligible completed deliveries accepted while the promotion is in effect. In Earn by Time, it adds to the guaranteed active-hour rate. [2]
A “+$2” figure without its unit isn't enough information. These constructed examples show why:
+$2 per eligible delivery
If the terms apply and you complete three eligible deliveries, the extra is 3 × $2 = $6 before costs.
+$2 per active hour
If you complete 30 eligible active minutes, the extra is 0.5 × $2 = $1. That is not $2 for each order or each hour online.
Example data, not live promotions or a comparison of total earnings between the two earning modes. Base pay, tips, other incentives and costs are not included.
For a batch, don't blindly multiply a bonus by the number of orders inside it. DoorDash's batched-offers page says Peak Pay may be paid per single or batched delivery. Check the terms shown to you. [3]
The destination doesn't automatically change your incentive
DoorDash's standard multi-zone example bases Peak Pay on where the dash started, not on a higher-bonus zone where the last customer happens to be. Its same-starting-point example also combines eligible overlapping incentives. [2] Don't infer either result just from seeing a number on another part of the map.
Check the eligible starting point, your earning mode and when the offer must be accepted. Not every promotion is a simple fixed window: the published Dynamic Peak Pay pilot has no preset start/end time. [2] Read the actual offer in your app rather than treating one example as every Dasher's rule.
DashFox's map is recorded offer-rate evidence—not a live queue
DashFox's map groups offer-rate observations into areas and lets you view median $/hour or $/mile. Tapping an area shows both medians and an offer count. The hourly rate is based on an offer's quoted pay and estimated time, not a measurement of wages for every hour someone spent online. [4]
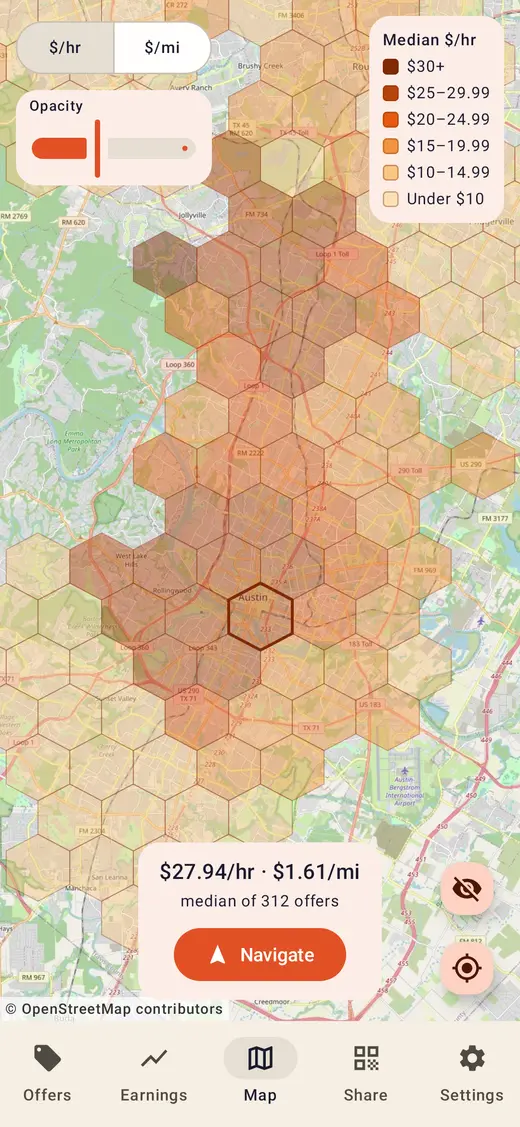
Read the count as offers, not drivers, completed deliveries or a representative city sample. A median rate doesn't include the idle time before the next offer, the cost of reaching the area or your vehicle expenses. It also doesn't establish that the same opportunities will be available when you arrive.
The useful distinction is simple: DoorDash's flame describes order demand; an eligible Peak Pay offer describes extra pay under its terms; DashFox's map helps you examine recorded offer-rate observations. None is a guaranteed shift wage.
A better “where should I wait?” check
- Start with somewhere you can wait safely and legally. Review the map and promotion terms while safely stopped, not while driving between pins.
- Read the demand label. Is it a currently busy area or a historical one? Don't turn a historical label into a live-order claim.
- Read your own bonus conditions. Check eligibility, earning mode, unit, starting point and acceptance timing.
- Price the move. Add the travel minutes and miles before the first possible offer, and consider where likely routes leave you. A future offer is still uncertain.
- Use recorded rates as context. Check the offer count and what the metric measures. Sparse observations are uncertainty, not proof that an area is bad.
- Review the completed shift afterward. Compare gross earnings per total online hour and your mileage, rather than remembering only the biggest bonus banner. Our best-times guide gives a local shift-log method.
Once an actual offer arrives, judge its total payout, route and time on their own merits. Our offer calculator can compare the gross projection under different time assumptions; it cannot predict how soon another offer will arrive.
Quick questions
Do I have to sit inside the red Hotspot area?
No. DoorDash says you do not have to be inside the red area to receive an order. Proximity can affect the likelihood of receiving one, but Hotspots do not guarantee orders. [1]
Why am I seeing no Hotspots?
DoorDash says this can simply mean no location is busy enough to create one. Your app can still work and you can still receive offers. [1]
Does dropping off in a higher-bonus zone give me that bonus?
Don't assume so. DoorDash's standard multi-zone example uses the dash's starting point. Check the promotion you are eligible for and its current terms. [2]
Is a DashFox map rate what I will earn there?
No. It summarizes recorded offer-level rates, not a promised whole-shift wage. Include waiting, repositioning, costs and the limits of the available observations when making your decision.
Keep reading
Sources and example-screen provenance
- DoorDash Help: Stay busy and earn more with Hotspots. Dynamic/historical labels, ten-minute refresh, red-area and no-guaranteed-orders limits. Checked November 4, 2026.
- DoorDash Help: Peak Pay. Eligibility, earning-mode units, acceptance timing, overlapping incentives, starting-point examples and Dynamic Peak Pay pilot. Checked November 4, 2026.
- DoorDash Help: Why did I receive multiple offers at once? Per-single versus per-batch Peak Pay wording. Checked November 4, 2026.
- DashFox example map render. App map controls and hexes with generated fixture offers; the source render was made October 5, 2026. The $27.94/hr, $1.61/mi and 312-offer figures are fictional examples, not live market observations. OpenStreetMap attribution remains visible. Map UI labels and offer-rate computation checked against app/backend source November 4, 2026.
Promotion calculations are constructed unit examples, not available incentives or a recommendation to choose one earning mode. The map image contains example data, not current or representative Austin results. No diagram, median or incentive guarantees orders, earnings or profitability; follow the current terms shown in your Dasher app.